

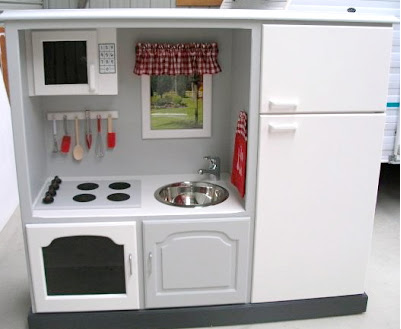
Over a year ago I came across this adorable play kitchen from giggleberry creations found here.
Well when all is said and done I didn't have a girl, I had four boys, and I am happy with that. I love my boys. And seriously have no sadness for not having a girl---4 boys rocks. However, I remember my playkitchen when I was little, which looked just like this one...


Like it is when I get any new project in our garage, I start itching to get started. Being a mom I have to wait until kiddos are napping, or it is quiet time, so I tried to be patient before going to the first step which was dismantling. Here is a run down of steps you need to realistically expect if you want to tackle this project:
- Get furniture piece (duh)
- Decide on what you are going to do with it and get supplies (this part takes me the longest)
- Dismantle. Using your screwdriver remove all hardware (and doors/drawers, etc)
- Lightly sand using around 150-220 grit depending on the project. Sand with the grain. This will help the stain or paint adhere to the surface.
- Clean off all dust and grime.
- Cut out sink hole and drill holes for faucet to fit into. For the sink, I drilled a big pilot hole and then put my jigsaw's blade in the hole and cut out towards my circle I had traced using my bowl (sink) as my guide
- Attach (screw in) any backing you want on. In this case I had bought bead board at Lowes ($20 for 4'x8' sheet)
- Prime and paint. There are lots of good articles as to when to prime and when not to, but here is a good site to check out if you are confused like I was. Also, I would not do this project without my handy dandy Wagner paint sprayer because this part took forever and if I were hand painting I think I might have killed myself. Plus, let's be honest, seeing brushstrokes is enough to make a person mad. If you chose the spray paint route you would go through a TON of aerosol spray paint cans (and a lot of money). With the Wagner you buy good latex paint, barely water it down, and turn it on. Works just as well as any Rustoleum spray paint and looks professional.
- Re-attach everything in the way you want it, and glue on each piece. For this piece I did a ton of things different than just putting things back the way they were. See below for instructions on how I did each...
 |
| Add caption |
Here is everything dismantled, the bead board put on the back, as well as the doors.
(I thought glass might not be the best for a fridge front,
let alone when we are talking something to play with for kids.)


After all of these steps I painted.

- Painted a smaller frame to use as the window, but then it looked too small so decided to make that into a chalkboard menu and found a bigger frame that we already have. Painted that. Then broke the glass that went into it. Dang it. Had to re-think what to use. Neighbor gave me a creative idea for the broken window, and now the window is much more safe...no longer glass.
- Oven door had the hinges changed from being on the side to being on the bottom so that it could open the way an oven should. With this change though, the door no longer closed...it was now too high. So had to un-screw the hardware and take the door to a table saw and saw off 1/2". Re-sand, re-paint. Re-do hardware.
- I used chalkboard paint for the oven door front as well as the Menu. These were successful, but taping and then painting several coats always takes longer than I want to take.
- The knobs wouldn't turn like I wanted them to, so I took them all off, sanded down the bottoms of them hoping that would now make the screws holding them down too long and thus the knobs would freely turn. In the end that still didn't work, and I figure, this kitchen is for IMAGINATIVE play, let them use their imaginations that these turn :).
- There are a million other things that needed to be done numerous times, but why bore you with that. The lesson I am passing on to all of you is expect things not to go as perfectly as you think. It is super frustrating and many times I wanted to throw my screwdriver because I couldn't get the screws in the right places, or things just weren't going my way, but it all worked out. And hopefully only I will notice the imperfections in the end.
- I got the faucet for the sink from Home Depot. They have a simple faucet with your hot and cold knobs for $14. I wanted to find one for $5, but Goodwill didn't have any. The manager at Home Depot, who showed this set to me, gave it to me for 50% off since the box looked like it had been opened and might be missing something crucial if you were indeed planning on using this for a real sink. Since it was for pretend I didn't care, and for $7 for a brand new piece...SCORE!
- For the stove pieces and bowl/sink, I used Gorrilla glue to adhere them. That stuff is STRONG! Wowsers. Follow the instructions and you will never be able to move these things again. Trust me I found out the hard way. One of my stove plates moved South while drying (long boring story), and so I had to use a chisel and hammer and remove it to re-glue it. Annoying. But proof that Gorilla glue is as good as it claims to be.
- My wonderful mother in law made the valance. I bought the fabric and was going to use my gorilla glue to make it look like it was sewn, but she said to let her make it with her sewing machine...probably a better decision. We just put it on a simple piece of wood we already had, and then screwed in screws from behind the unit, into the ends of the wood piece.
- I loved another crafter's idea to use a push light from the Dollar Tree. I put velcro on the bottom of it so that it can be taken down to replace batteries, and then hooked it on to the "ceiling" for an added fun feature.
- The piece is on coasters. For some reason I love this. I got it this way and it is so easy to move when on a smooth surface. They can easily be removed by the future owner though, if they don't want the kitchen to move around.
- The oven shelf is using an old cooling rack we had. I used my Dremel and cut off one row so that it would fit, and then screwed in two screws both sides for the rack to sit on, and then a screw on each side right above the rack so that kids can't take it out (for safety reasons as well as they won't lose it).
Here are some close-ups of everything....


 |
| Close up of beadboard within the fridge doors. The lighting wasn't great, but these are truly white. |
 |
| Oven could be drawn on with chalk too. Added fun feature :) |
 |
| Adorable 5 piece stainless steel cooking set included from Ikea |
 |
| Added hooks so that cooking utensils can be displayed and easily accessible. Thanks Ikea for making adorable play sets. |
 |
| Menu ready to be written out by the chef |
 |
| Ad I made on Picmonkey for Facebook pages that don't like items to have a lot of pictures. |
So many hours later it is done and being posted for sale. Pottery Barn sells this for $480 when all is said and done. On etsy, other conversions like mine (which are not nearly as awesome ;) ) go for $500 (and that isn't including shipping and tax...yowsers).

2/24/2015 Update: My lovely friend bought this kitchen for her two daughters for a little less than I was asking. I had a request to update some furniture for a client and needed the garage space so I lowered the price and she (and a few others) jumped on it. I am happy it went to a great home and will get a lot of fun and use out of it. Heck, it will probably be in good shape for when she has grandkids too!
Here is what I spent on the piece for any of you that want to do this yourself and would like an idea on supplies:
Entertainment center: free
Chalkboard paint: $8-10 (I already had it on hand)
Latex paint: $13-15 for a quart of the good stuff (already had it)
Spray Paint: $3-5 can. I used Rustoleum's rubbed bronze and hammered nickle? (not sure which one it was I used for the knobs). I already had these so no cost to me.
Push light: $1 from Dollar Tree
Utensils and pots and pans: $14.92 from Ikea
Beadboard and pulls for oven and fridge: $26.14
Basket: $12.39 from Michaels using coupon
Faucet: $8.04 from Home Depot (50% off from manager)
Sink, Stove, frame: $7.03 from Goodwill (50% because of Club Blue member)
Valance: $3.70 for a yard of fabric from Walmart (didn't know I could buy less than a yard)
Total out of pocket for me:$73.22
For others if you don't have the supplies: $108 approximately

Thanks!
 How to Get Office Built Ins using Ikea shelves and old cabinets
 How to Make Simple Frames for Mirrors of almost any Size
 DIY Chic Farmhouse Table
 How to Easily Build a Rustic Corner TV Stand AND How to make Homemade Liming Wax for a RH Finish
Hi! I have a question about how you did the fridge doors. I am doing this same project and my door has glass in it as well. How did you remove it? Did you just break it and it fell out and then how did you add the beadboard in its place?
ReplyDeleteGreat question Madison. If you look at the picture where the doors are opened and now holding the bead board, you'll see four little peg like brackets per door. They are held in by screws, which once the screws were removed the glass comes right out. I've never seen one with the glass permanently held in, but if you have one like that I guess breaking it is your best option! Best of luck in your transformation!
DeleteThanks Mimi!
Delete